Securing the JMS Adapter
There are two types of users associated with the JMS adapter, Runtime Users and Schedulers. You maintain definitions for both types of users from the Users pane.
-
Runtime Users
Runtime users in the context of JMS jobs is used as default user identity for creating a connection.
-
Schedulers
Schedulers are those users who will define and/or manage JMS jobs. There are three aspects of a user profile that grant and/or limit access to scheduling jobs that invoke JMS:
Security policy that grants or denies add, edit, delete and view capabilities for JMS jobs.
Authorized runtime user list that grants or denies access to specific accounts for use with JMS jobs.
Authorized agent list that grants or denies access to specific JMS adapter connections for use when defining JMS jobs.
Defining Runtime Users
To define a JMS runtime user:
-
Click Administration > Runtime Users on the Navigation pane to display the Users pane.
-
Right-click and choose Add Runtime Users from the context menu, or choose and existing user and choose Edit Users to display the User Definition dialog.
Note: If this is a new user definition, enter the new user name in the User/Group Name field.
-
Enter the Full Name or description associated with this user.
-
Click the Domain field.
-
Click a Windows domain associated with the user account required for authentication, if necessary.
-
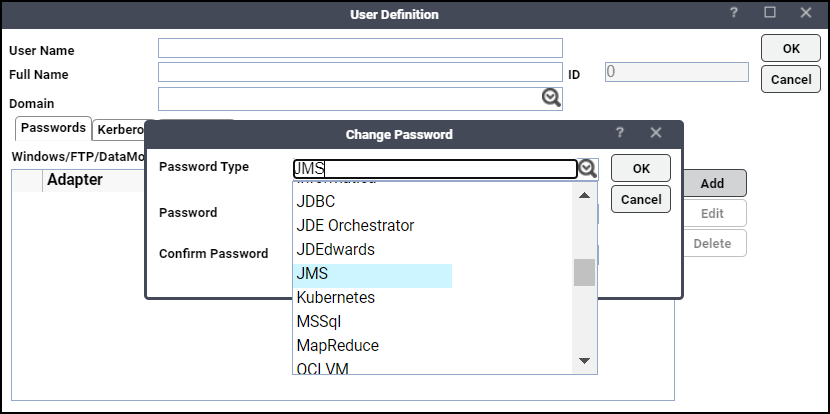
Click Add on the Passwords tab to define this user as a runtime user for JMS jobs.
-
Enter a password (along with confirmation) for JMS Password.
Only those users with a password specified for JMS will be available for use with JMS jobs. The password may be the same as the one specified for Windows/FTP jobs.
Note: If you have updated the passwords and are experiencing issues with running jobs or events, we recommend disabling and re-enabling the connection to ensure everything works properly.
-
Click OK to return to the User Definition dialog.
-
Click OK to add or save the user record in the TA database.
Authorizing Schedulers to Work With JMS Jobs
Authorizing schedulers involves these tasks:
-
Defining a Security Policy
-
Defining JMS TA Users
Defining a Security Policy
To define a Security Policy that authorizes access to JMS jobs:
-
Click Administration > Security Policies on the Navigation pane to display the Security Policies pane, listing all defined users.
-
Right-click and choose Add Security Policy from the context menu, or click an existing policy and choose Edit to display the Security Policy Definition dialog.
Note: Refer to the Tidal Automation User Guide for a general discussion on setting up security policies that you associate with TA Users.
-
Scroll down to the JMS Jobs category on the Functions tab, click the ellipses and choose the functions to be authorized under this policy (Add, Edit, Delete and View JMS Jobs).
-
Click Close to close the Function dropdown list.
-
Click OK to save the policy.
Defining JMS TA Users
To define a TA user to work with JMS jobs:
-
Click Administration > Interactive Users on the Navigation pane to display the Users pane, listing all defined users.
-
Right-click and choose Add Users from the context menu, or click an existing user and choose Edit Users to display the User Definition dialog.
Note: Refer to the Tidal Automation User Guide for a general discussion on setting up a user to work with TA.
-
Click the Security tab.
-
Click a security policy that includes authorization for JMS jobs.
-
Click the Runtime Users tab.
-
Choose the JMS runtime user that will be used as default user identity for creating the connection
-
Click the Agents tab.
-
Click which JMS connections that this scheduling user can access when scheduling jobs.
-
Click OK to save the user definition.